Slow Cooker Buffalo Chicken Wraps – Freezer Meal

Always on the search for easy to prepare, healthy, make ahead, freezer meals, I came across a pin for Slow Cooker Buffalo Chicken from Emily Bites. Below is the picture from her website. This recipe is so easy that even my favorite cellmate could make it!

Her picture looks so delicious and her blog says 1/2 cup is worth only 3 Weight Watcher points. I have to wonder if that included the bun?

Emily laid out the directions quick and easy, so easy I thought even I could do  that. I also thought it would make a great freezer meal.

When the chicken was done I thought the sauce was too watery, I wanted something thicker like a BBQ sauce. I also wanted to stay a bit healthy so I decided to ditch the bun and make it as a lettuce wrap. I forgot to by butter lettuce which is great for wraps so I used Romaine instead. Below you will see what I did.

Slow Cooker Buffalo Chicken 

  • 3 lbs raw boneless skinless chicken breasts
  • 12 oz bottle of Buffalo wing sauce (Emily recommended Frank’s Wing Sauce)
  • 1 oz packet of dry Ranch mix ( Hidden Valley)

The original recipe included 2 tablespoons of butter, I decided to skip that to save on fat and calories.

  1. Dump the sauce and Ranch dressing mix in a bag and mix, then add chicken.  Toss in freezer.  If you don’t want to freeze then dump everything in the slow cooker.
  2. Cook on low for 8 hours.
  3. When done Shred chicken.
  4. Eat and enjoy.

Emily recommends that after shredding the chicken you let it cook on low for another hour so it absorbs the juice.  I forgot to read that part.

What I did – I took put the cooked chicken in my Kitchen Aid mixer and used that to shred the chicken.  I also saw this on Pinterest and it is just the coolest thing, shredded chicken in less than 30 seconds!

I found the sauce to be too watery so I put it in a sauce pan with about a tablespoon of corn starch and let it boil till it was thicker.  A hint my mother-in-law taught me is to put corn starch or flour in a small jar with COLD water and shake it up before adding it to any hot liquid, this way you don’t get any lumps.

I then added the sauce to the chicken and served on Romaine lettuce. (Sorry, her picture looks much more appetizing than mine)

Review: First I have to say this was so easy and quick to make, it turned out great. It was so fast and easy to prepare even with the extra steps I added thickening the sauce.  I think I could have easily added another chicken breast or two as the sauce was very plentiful.  I think it would have tasted better on a good bun but as I mentioned I am trying to cut calories. I also think this would have made a great party dip. I am a wimp when it comes to spicy food and I thought this had just the right amount of heat but great flavor.

Here is the nutrition information from Emily Bites

Yields 12 (1/2 cup) servings. WW P+: 3 per serving (P+ calculated using the recipe builder on weightwatchers.com)
Nutrition Information per serving from myfitnesspal.com: 175 calories, 1 g carbs, 5 g fat, 28 g protein, 0 g fiber

Salad in a Bag – Healthy way to eat salads daily.

One of my healthy lifestyle goals is to increase the amount of vegetables in my diet. Not being a vegetable fan this hasn’t been easy. I am also too lazy to make a fresh salad everyday.  I have seen several posts for making salads in a jar on pinterest and I was inspired. I was worried about the vegetables getting old and rotting if I made several batches so I came up with the idea to use my Food Saver vacuum sealer. I received this as a gift several years ago used it a few times then moved it to the garage to make room in my uber small kitchen and promptly forgot about it.  I am so happy that I remembered I had it and even found a box of vacuum seal bags in the back of my cupboard. Really this just means I need to clean out and organize my kitchen a bit.

To test this method I made just two salads. I wasn’t sure how quickly I would eat them since I get really tired of having salad every day. I made these up on Sunday and had one on Monday and one on Friday. The Friday salad was just as good as the Monday one. The lettuce was fresh and crisp, and the avocados were still nice and green.

Each salad included romaine lettuce, 1/2 an avocado, a handful of : cherry tomatoes, carrots, and broccoli.

I think this is a great method for make ahead lunches, saves, time and saves money. I can’t tell you how much produce I have thrown away over the years because it rotted in my vegetable crisper.

I do have a few hints and tips.

1. Wash and dry all vegetables, especially lettuce,  thoroughly before you vacuum seal.  If you have a salad spinner use it, if not put the lettuce in a clean cloth bag like a pillow case and swing it around. This works great as a poor mans salad spinner and doesn’t take up much room in your pantry.

2. Do not include any salad dressing or oil in the bag as it will cause the lettuce to wilt.

3. Be careful not to put too much in one bag. I actually was a bit over zealous and was full after about 3/4 of each salad.

4. The bags allow you to use less dressing. When you are about to eat the salad add about 1/2 the dressing you normally would fold the bag closed and shake. You will find everything to be evenly coated and are likely to use less dressing.

5. Fold the top of the bag down to create a bowl, fewer dishes to wash!  This is my healthy lunch on Friday.

6. Bags can be washed and re-used. Just make sure to wash well by hand and prop open by placing over the blender, a tall glass, or a wooden spoon in a glass so the bag can completely air dry. If you are worried about germs, fill the bag with water and a teaspoon of bleach. swish around and rinse well. Let air dry and re use.

I like using the bags instead of mason jars because they take up a lot less room in my cupboard and I don’t have to worry about glass breaking.

A Tale of Two Salad Dressings

Yesterday I wrote about a delicious Spinach Berry Salad I made and wanted to take a moment to talk about the salad dressing I chose and the importance of reading food labels.


Since I started my healthy lifestyle change I have been taking the time to make more conscious decisions on haw and what I eat so I started reading and comparing labels and have been so shocked by what I have learned.

I wanted a light, low fat dressing that was healthy. After reading several bottles I narrowed it down to two choices.

 Annies Naturals Fat Free Raspberry Balsamic  and Kens Fat Free Raspberry Pecan 

Now normally I try to stay away from fat free, low calorie food because I know they make up the difference by adding chemicals, strange things, more fat for less sugar or more sugar for less fat. Salt, and God knows what. I feel in the long run a little healthy fat is better for you than strange chemicals.

Here are pictures of each dressing, sorry for the poor photography, I was using my cell phone and getting strange looks from other customers.

When reading labels the first thing you want to look at is the serving size. Make sure they are the same so that you are comparing the same information. Some manufactures reduce the serving size to make it appear they have fewer calories but if you compare equal amounts it is not always the case.

Here is what I found. Both products have a serving size of 2 tablespoons, neither have any notable nutritional value, neither had any fat.

Kens had 50 calories per serving and Annies had 30 calories. That was a significant difference. Kens had 280 mg of sodium (12% of the recomended daily intake) Annies had 10mg) Major difference!!!

Then I looked at the ingredients.

Kens: water, high fructose corn syrup, cider vinegar, sugar, cucumber juice, maltodextin, salt, Less than 2% of red raspberry juice, pecans, potassium sorbate, calcium disodium, EDTA, xanthan gum, carrageenan, onion, spice, lemon juice concentrate, garlic, natural and artificial flavor, Red #40, Blue #1

So basically it is sweet, salty, chemical water???

Annies: water, balsamic vinegar, can sugar, raspberry concentrate, distilled white vinegar, xanthan gum, raspberry flavor, sea salt.

Now except for the xanthan gum, I recognize and can pronounce all of these ingredients.

Sorry Ken, Annie is the clear winner in this round.

Ken did win one round in this battle though and that was in price. Ken was on sale for $3.59 for 16 oz while Annie was $4.29 for 8 ounces but you can purchase it online for $2.99. Still when I compare the list of ingredients, Annie is still the clear winner.

As for taste, I cannot comment on Ken’s but Annie had a nice light flavor just the right amount of sweetness and tart that makes a good vinaigrette. The dressing was a great compliment to my Spinach Berry Salad.


Strawberry Spinach Salad

Last week my friend took me out to lunch at Applebee’s where I had their delicious SEASONAL BERRY & SPINACH SALAD Spinach leaves tossed in our strawberry vinaigrette. Layered with juicy blueberries, sliced strawberries, grilled chicken breast, bleu cheese crumbles and honey-glazed pecans. (Picture below is from Applebee’s)

The salad was delicious and I have been craving one every since but being cheap and lazy I decided to make one of my own. I was also hoping to cut down some of the calories by eliminating/changing the honey-glazed pecans, blue cheese, and vinaigrette dressing.

Here is the nutritional breakdown from Applebees for 1/2 salad.

Salad with dressing- Calories 320, fat 17gm, carbs 21 gm, fiber 4 gm, protein 27gm

The Pin Addicts Berry Spinach Salad

Nutritional information from fatsecret.com including dressing.

Calories 164, Fat 11.13 gm, Carbs 13.54, Fiber 4.4 gm Protein 6.14 gm

Now granted my salad did not have any chicken on it but for fun I added it to the ingredients list to see how it would compare

My salad with 1/2 cup chopped chicken breast: Calories 296, Fat 16.34, Carbs 13.54, Fiber 4.4, Protein 26 gm

Wow! I was surprised I thought that my salad would have been a lot less in comparison. Either way my salad was still delicious, healthy , and in the long run a lot less expensive.

Diet tip – When eating salads and vegetables it is actually good to have a little fat with the salad. Fat helps you absorb fat soluble vitamins such as Vitamin A, D, E, and K.  The secret is to not overload your salad with fats. Use a low fat dressing, avocados, or a low fat cheese. The fat will also help you feel more satisfied and full.

Salad dressing tip: To reduce the amount of calories and fat measure your dressing before putting on your salad, also try watering down your dressing. Start with 1 tsp of water to 1 tablespoon of dressing. work your way up to 1 tablespoon of water 1/4 tsp of dressing.

P.S. the Annies Naturals salad dressing listed above is only $2.99 if you order it on their website. I paid 4.29 at my local store. They also have several other great products listed on their website.  I did not receive any compensation for this listing, I just love this dressing and wouldn’t mind if they sent me samples of their other products (hint, hint).

Easy Low Calorie Parmesan Chicken Bake

Another recipe that is so easy my husband could make it!  

There are only 4 ingredients! 

Takes only minutes to prepare!

Recently I was watching a mayonnaise commercial with a recipe similar to this and could only think Yew, ick, all that fat and grease. No don’t get me wrong, I love mayonnaise and could almost eat it straight out of the jar but since I started eating healthier I noticed that fatty greasy foods just don’t look as appealing as they used too.

Soon after watching the commercial I came across an alternative on Pinterest that uses Greek Yogurt.  I was skeptical but since I just happened to have the ingredients on hand I thought I would give it a try. The original recipe is Melt in Your Mouth Chicken. After reading through the comments I decided to change it up a bit.

Lo-Calorie Parmesan Chicken Bake

  • 3 lbs skinless chicken breasts (about 6 medium breasts)
  • 1 cup Greek Yogurt 0% fat (I used Chobani)
  • 1/2 cup shredded Parmesan
  • 2 tble Dijon mustard

1. Mix yogurt, cheese, and mustard in a bowl.

2. Dredge the chicken in the mixture to completely coat

3. Place chicken in greased baking dish, top with any remaining cheese mixture.        I used two dishes so it would fit in my crowded fridge better.

4. Bake at 375 for about 45 minutes until done.


Make Ahead– Prepared everything the night before and let sit overnight in the fridge so that when I came home from work all I had to do was heat up the oven, cook up a side, we had quinoa and carrots, and make a small side salad.

This recipe was so easy, the chicken came out tender and juicy and was full of flavor.

Alternative versions:

  • You can substitute the Greek yogurt with plain yogurt, sour cream, or mayonnaise but remember you will be adding extra fat and calories. 
  • Instead of using Dijon mustard add your own mixture of herbs and spices. Black pepper, salt, garlic powder, and a little oregano or basil.  Use crushed garlic or just some season salt. Try using your favorite poultry seasoning. 
  • Sprinkle the top with bread crumbs for a crunchy layer.
  • Wrap each breast in foil and bake on the grill.
  • Use Cheddar cheese and crumbled bacon.

My husband ended up eating two servings because it was so good, we packed the rest of for lunches, I hid two in the back of the fridge so he wouldn’t eat them before I did. 🙂 There were just as good the next day.

Enjoy! 

Battle of the Beauty Boxes- Beauty Army July Box

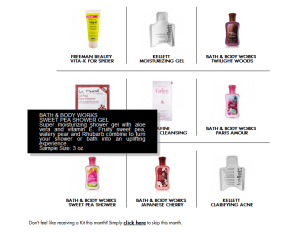
When I reviewed my June box from Beauty Army I gave them a bit of a bad rap, I decided to give them another month to redeem themselves and boy have they! I love this months box.  The advantage of Beauty Army is that you get to pick 6 out of 9 products to receive the following month. You also have the option for them to surprise you.  What I also learned is that while you are making your selection a description pops up letting you know exactly what you will be getting. They even added an opt out feature so if there is nothing you are interested in you won’t be charged for that month. My only complaint is I wish they gave you a better selection.  Below is a picture of what was offered in the August box.

You can see that 4 of the 9 options are for Bath and Body Works Body wash, each a different scent. If you like scented body wash this a great deal but if you don’t you are not left with too many other choices.  In this case I would normally opt out for a month but I thought the body washes would be good for gift baskets, etc.

So onto July’s Box!

M academia Nut Hair Healing Oil Treatment 4.2 oz $18.95 Our Healing Oil Treatment is a therapeutic hair oil perfect for all hair types and is especially beneficial to dry, damaged hair.Intense nourishment for tangle & frizz free hair, Hair that is ultra-smooth, manageable & shiny, Natural UV protection extends the life of color treatments, Reduced drying time by an amazing 40-50%

Review – I am in love with this Hair Treatment. I only use a very small amount, about 1/4 tsp so 4 ounces will last quite awhile. It smells good, leaves my hair shiny, soft, silky, and with less frizz and fly aways. I try to let my hair air dry as much as I can and I feel that the hair oil did help reduce drying time. I absolutely will buy this product again.

Cellceuticals Ceractive 2 oz $47.50 CerActive Moisture + barrier repair skin treatment is a deep penetrating moisture and barrier repair treatment that works between surface cells to soothe dry skin and provide long-lasting hydration. This moisture and barrier repair treatment replenishes essential barrier lipids (ceramides and fatty acids), humectants, and anti-irritants to help stregthen skin’s water lipid barrier while providing deep hydration and skin-soothing properties.

Review – This was a nice light lotion that gave the perfect amount of moisture without feeling greasy. Do I look 10 years younger? Are my fine lines gone? Can’t really say but I did like this lotion, it absorbed well and didn’t leave my skin feeling coated.

Atzen Lip & Eye Emulsion .5 oz  $75 Calms tired eyes instantly; numerous peptides & retinyl palmitate energize wrinkle reducing activity. Dark circles & discoloration due to hormones & sun damage virtually disappear over time. Reduces puffiness & hydrates.

Review – I love this eye cream, first off it is very light and a little goes a long way. You may balk at the $75 price tag but that small amount will probably last you a good 6 months. I didn’t notice much around my eyes but I did notice that my lips felt softer with less pealing and cracking.

Delizioso Skincare Mangosteen & Acai Super Anti-Aging Facial Cream 1oz $58 100% Natural Mangosteen & Acai extracts along with Alpha Hydroxy Acids use a potent anti-aging system of antioxidants to perfect dull skin. Organic oils nourish while aloe and pure juices of cucumber and blueberry rehydrate. As you apply the moisturizer Vita Burst Beads infused with a potent dose of Vitamin E, Acai, and Mangosteen pop and start to act immediately. This technology helps keep the potent ingredients at their very peak of action.

Review – This is a nice cream but it has a strong vanilla scent that I find a bit overpowering for a face cream, as a scented hand lotion fine but not on my face. The scent lasts quite awhile also. I found myself sneezing throughout the day.

Indie Lee Squalane Facial Oil 1 oz $32  A naturally occurring oil that promotes elasticity in the skin. As we age, its production diminishes. This key component of our sebum helps boost cell regeneration and oxygenation, leaving your face looking healthy and radiant.

Review– I don’t know what I like more, this or the Macademia nut oil. I was a little surprised since I have oily skin whether I would like this or not. The sample bottle came with a built in dropper that took up the perfect amount. Probably about 0.25 ml. A really small amount. It was a light oil that absorbed quickly into my skin. I felt well moisturized but was amazed that after a minute or two there was no oily greasy feeling like I have with other facial lotions. I have been very happy with this product and will be purchasing more in the future!

I have included a link for all of these products to my Amazon store in case you are interested in trying them yourself!

If you would like to subscribe to Beauty Army and receive your own beauty box, please click this link! Beauty Army.

Battle of the Beauty Boxes- Birchbox-July Box

So I finally found time to write up a review of the July Beauty Box from Birchbox.  Just a recap- Beauty boxes are a subscription service where you pay a fee and each month you receive a nice box in the mail full of sample beauty products and occasionally a full size product. So far I am having a lot of fun with these subscriptions, it is like getting a fun surprise in the mail each month that isn’t a bill.

I currently have two beauty box subscriptions and Birchbox is by far my favorite. If you are interest in signing up for your own subscription please click on the link so I get points for recommending you. Birch Box Subscription.  You can also read my original post about beauty boxes here. 

Below is a list of the products I received, a short description and my review. Enjoy!

Tea Forte Minteas 3 pack $9.95  Tea Forte, known for their stylish tisanes, is introducing clever mints that have both wellness and breath-sweetening properties. All-natural and sugar-free, Minteas are infused with organic green tea, herbs, and fruit extracts to give you an instant antioxidant boost.

Review- SO not impressed, the mints do have a nice light flavor but it is so light I don’t know how they would freshen your breath. I will stick to Altoids which are also a lot cheaper.

Eyeko Skinny Liquid Eyeliner $15 Twiggy fans, rejoice: this London-based brand’s liquid liners let you create mod looks in a flash. Rather than frustrating us with hard-to-control brush tips, they feature a pen-style applicator that’s completely goofproof. Give your basic black a break and experiment with rich Olive or punchy Turquoise. They’re guaranteed to make your eyes pop.

Review – This was  a very nice eyeliner pen, easy to use and apply. The eyeliner also lasted all day with no smudging or flaking unlike the brand I used to use. I am trying to lighten up my eye look and don’t use black eyeliner anymore otherwise this would certainly be on my list.

Alterna BAMBOO® UV+ Color Protection Fade-Proof Fluide 2.5 oz $24 This fade-proof finishing gloss is the next generation of hair protection. Not only does it strengthen dry or brittle strands, but it also helps protect your hard-earned color from sun damage. Use it regularly to keep your hue true and healthy until your next appointment: it’s clinically proven to help retain color and brightness for 60 washes. If you don’t color your hair, you can still use this product to keep strands supple and shiny.

Review- I have only used this product twice and must say I love it, it goes on nice and light, smells good, and it seems to help keep my frizz down. I color my hair red which fades quickly, since I have not used this product regularly I cannot attest to the fade protection properties. Honestly would I purchase this? Probably not, mainly because of the price and I prefer another product I received in a later beauty box called Macadamia hair oil.

Supergoop!® City Sunscreen Serum – 1.5 oz $42Day-to-day sun exposure requires the same precautions as an afternoon spent poolside. This light yet powerful serum fulfills that everyday need. Both a moisturizer and a broad-spectrum SPF 30, it fights the signs of premature aging—think fine lines and sunspots—and prevents future photo-damage from UV rays. Built for year-round use, it’s great for layering under foundation. The mattifying formula can also stand alone on the days you’re not wearing makeup.

Review – None, sorry, I have to honestly say I have not tried this product yet, I put the sample in my purse to have for emergency sun screen.  I do like the idea of having a moisturizing sun screen that is also mattifying.

Harvey Prince Hello – 50 ml $55 Allow us to introduce you to your new warm weather scent. For their latest fragrance, the brother duo behind Harvey Prince decided to mimic the joy of waking up to a warm day with the sun shining and the flowers blooming. The resulting blend is an energizing mix of citrus and floral notes that will keep you optimistic even when you get up on the wrong side of the bed.


Birchbox Exclusive Earbuds $10 Whether we’re jogging through the park or powering through a laptop session, earbuds are one of our constant accessories. So we started thinking: why stick with the same boring white pair we’ve been using for years? We designed these custom pink and green or pink and blue neon earbuds so we can rock out to our favorite tunes in style. They’re extra-durable and extra-comfy—now that’s music to our ears.

Review – This was a nice surprise since I needed to buy an extra pair of earbuds to keep in my gym bag. These work great and were very comfortable. I just wish they came in pink!

I am still in love with Birchbox and plan on keeping my subscription for awhile, I find that I always get my moneys worth from them, Heck my monthly subscription is $10 and I probably would have spent that much on earbuds alone!

Grilled Pineapple-Chicken Packets-Microwave Version

I was searching for an easy recipe that my husband could make for dinner.  He is wonderful at making dinner as long as I do the shopping, find a recipe for him, then clean up the kitchen.  I usually pick something simple with few ingredients, little prep (less mess for me to clean), and ideally involves cooking on the grill.

Grilled Pineapple-Chicken Kabob Packets

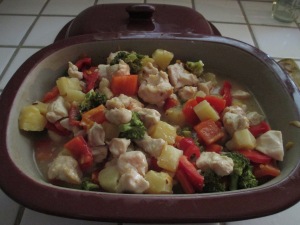
In my search I came across this recipe (See above picture) for Grilled Pineapple Chicken Packets . It looked good and sounded simple enough. I bought all the ingredients, printed the recipe and left him instructions. of course something came up and he wasn’t able to make it.  Since I am not allowed near the grill since that is the man kitchen, also it is so old and with my luck if I tried to turn it on it would probably rebel, blow up and catch the patio on fire. So I decided to adjust the recipe and cook it in my Covered Baker from Pampered Chef. I am not a Pampered Chef sales rep but I love their products. They are expensive but so worth the investment.  What I love about the covered baker is that you can bake in it or use it in the microwave and food comes out great. Because it is made from stoneware it also keeps your food warm longer while sitting on the table.

Pineapple Chicken 

  • 1/3 cup pineapple preserves- I used Orange marmalade because I had it in the fridge. 
  • 2 tablespoons packed brown sugar
  • 1 tablespoon soy sauce
  • 1/4 teaspoon crushed red pepper
  • 4 boneless skinless chicken breasts, cut into 2-inch cubes (1 lb)
  • 1 medium red bell pepper, cut into 1 1/2-inch cubes
  • 1 medium green bell pepper, cut into 1 1/2-inch cubes
  • 1 cup pineapple chunks (Drain the juice)
  • 1/4 teaspoon salt

1. I placed the first 4 ingredients in my dish and mixed them together. In the future I would recommend doing this is a separate bowl and pouring on top of the chicken and vegetables but I was feeling lazy and didn’t want to dirty another bowl.


2. Cut up the chicken and vegetables, mix everything together and add to dish. Pour the sauce mixture over the chicken and vegetables.  I added broccoli since I am trying to eat more green vegetables. 


3. Cook in the microwave covered for 14 minutes or until done. Every 4-5 minutes stir the chicken and vegetables to insure even cooking.  If you don’t have a covered baker bake in the over at 350 for 30-45 minutes. No liquid was added, the liquid all came from the chicken and vegetables.


4. Serve over rice and enjoy.

The recipe was quick and easy.  I think it would have been better on the grill but love that it is so versatile. A lot of liquid was produced by the chicken so you might want to add 1-2 tablespoons of cornstarch in the beginning to thicken it while it cooks.  The chicken was still tender and juicy.


Pure Evil in a Jar

Have you heard of Biscof? If you haven’t you are so missing out. I first read about it on a blog by Susie Freaking Homemaker. After reading the blog about Biscoff Banana Bread, I was intrigued and made a mental note to look for the product. Then fate sent me a 15% off coupon for Cost Plus World Market, while perusing the aisles for something exotic to try I found this magical evil little jar.

Basically this is ground up cookies that are mixed to the consistency of peanut butter, or I should say cookie butter. What could be more delicious?  This creamy nectar is so delicious I almost ate the entire jar with a spoon. No joke, I couldn’t stop eating it. This is where the evil comes in. I find this is great on bagels, I melted it over some warm apple bread pudding, on toast, and my favorite, straight out of the jar. If you visit the official Biscoff website  you can find some amazing recipes and the history behind for this bit of heaven. This wonder spread out does Nutella with its deliciousness. Oh man imagine if Nutella was swirled with Biscoff? You got your Nutella in my Biscoff!  I think my taste buds just exploded at the idea.

So While I was licking any remnants out of the jar I thought perhaps I should read the label. I am so sad to say this product has no redeeming nutritional value what so ever. Evil, I tell you, pure evil. Nom, Nom, Nom.

Finally a cure for dandruff!

For most of my adult life I have had a terrible time with shampoo. I have a very sensitive scalp and at times will have severe allergic reactions to various shampoos. I also have very oily hair that needs to be washed almost every day.  My reaction to shampoos will be a mild dandruff to full on itching burning, flakey red skin. I get huge red blotches on my forehead and have scratched so bad I get sores.  The worst was one shampoo that felt like someone poured acid on my scalp.

Over the years I have tried cheap shampoos, expensive saloon shampoos, Tar shampoos(man those stink), special scalp treatments, washing my hair more and less often, even dish soap. I would get some relief but then after a week or two my scalp would flair up again and my sholders would look like I just came in from a snow storm. After spending a ton of money on expensive shampoos I came across a pin on pinterest about using apple cider vinegar to cure dandruff.  The pin lead me to this article 4 Reasons to Use Apple Cider Vinegar on Your Scalp Treatments by Josh Peterson, Planet Green

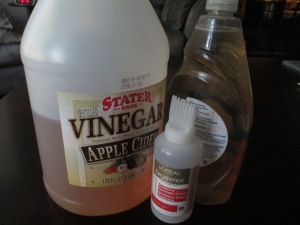
I had the vinegar so I thought why not. I had an old applicator bottle I kept from the last time I colored my hair. I liked the bottle because it has a comb tip that was easier to use. I recomend you buy some Loreal Excellence hair color just to get this great applicator bottle,  I filled the bottle with half vinegar and half water. After washing my hair I used the applicator bottle to apply the  vinegar rinse  directly on my scalp. It was a little hard to do so I took a bit of conditioner add it to my hair and the applicator ran through it easily. I let it sit while I finished my shower then rinsed.  Cider Vinegar is supposed to be a natural hair conditioner and helps to close the hair cuticle to cut down on frizz and breakage. My hair felt dry so I added another bit of conditioner and rinsed. My hair felt clean and smooth but I smelled like a salad.  This scent worried me as I didn’t’ want to spend the day smelling like vinegar. Later that day I was worried so I asked my co-monkeys and my favorite husband if I smelt funny and they said no funnier than usual.

A bit about dandruff. Dandruff can be caused by multiple things dry scalp, skin irritation, fungus/yeast, and/or a build up of oils.  Vinegar helps to clear away the excessive oil and is a natural anti-fungal. It is also supposed to restore the ph level to your scalp which keeps it healthy and prevents dandruff.

After I dried my hair my scalp felt great, my hair was shinny and smooth and my head didn’t burn or itch! Yeah! There were still some small flakes but I was thankful my shoulders didn’t look as if I had a staring role in an Al Pacino movie.

I continued to do some research on several sites and put together this treatment plan.  I used an old dish soap bottle to keep the vinegar mixture well stocked in my shower. In the picture you can see the applicator bottle that I love, the comb makes it so much easier to get the vinegar to my scalp.

Prep hair – Wash hair as normal, apply a small amount of conditioner and rinse, this helps the applicator bottle go through your hair easier.  Use an applicator bottle to really get into the scalp, you may want to massage in slightly so it gets in. If you don’t have an applicator bottle you can just use a cup and pour it slowly onto the scalp.  Let the vinegar sit on your scalp 5 minutes or longer. Rinse with cool water.  Warning! Be very careful to not get any in your eyes, believe me it is not fun. 

Week 1 -Start with a 50% vinegar solution (1/2 vinegar and 1/2 water). Use the vinegar rinse each time you wash your hair. I found I only needed about 1 ounce of the rinse to cover my scalp. I wash my hair every other day and noticed that with this treatment my hair seemed less oily on the second day. If this irritates your skin you may want to add more water.

Week 2 –  Use the rinse every other shampoo.

Week 3 – Use once a week.

Week 4 – Use once a month or as needed.  If you notice your dandruff acting up use the rinse more often.

Amazing! After all the money and experiments I had tried something that costs just pennies cleared up my dandruff. My skin reaction to shampoos has even calmed down a bit. It still flares up but no where near as bad as it used to be!  The best part is no one can make fun of how flaky I am! Well, perhaps just a little. 🙂

For even more dandruff fighting power try adding some dry herbs or essential oil to the vinegar rinse. Thyme, Rosemary, and Sage are supposed to be great for dandruff as well as Tea Tree oil.  Place herbs in a cheese cloth and let steep in the vinegar overnight. If you don’t have cheese cloth just strain before using.